
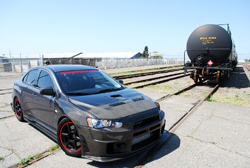
Installation of Aerodynamics: Comprehensive Fiberglass (FRP) Aerodynamics Paint & Installation
Updated 3/1/17Welcome to our revised guide on installing and painting aftermarket body kits and automotive aerodynamics. Here we will break down the process to educate our customers as to what they should expect to face when the receive their body kit and have it painted and installed. Many customers think of this process as simply dropping the part off for the body shop to paint it and then it's ready to install on the vehicle. This could not be further from reality as there are many steps required before the paint can even gets opened. Below we will educate you on the step by step process from test fitment to final assembly.
- Required Steps:
- 1) Test fit the parts on the vehicle
- 2) Drill mounting holes and install parts on the vehicle to identify any issues that must be addressed
- 3) Circle any defects in the finish with a marker and highlight any panel gaps that need attention.
- 4) Correct any issues to achieve correct panel gaps and alignment.
- 5) Remove the parts back off the vehicle and place on panel stands for surface finishing.
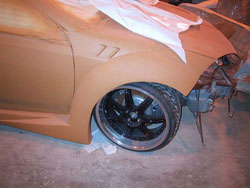
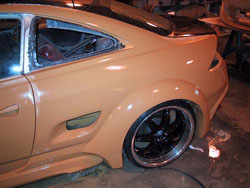
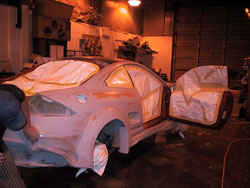
- 6) Body work will be needed to correct surface blemishes and once sanded and smoothed out will be shot with primer surfacer.
- 7) Once primer surfacer has been applied the parts will be final sanded in preparation for surface sealer and base coat color and top coat clear.
- 8) Optional step of wetsanding and polishing the finish can be done to achieve a mirror like reflection in your paint.
- 9) Once the parts have been painted and polished it is time for final assembly and delivery to the customer.
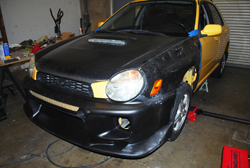
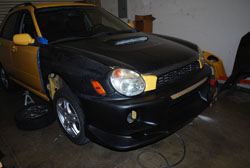
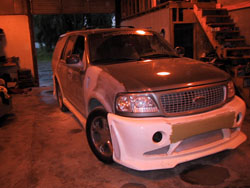
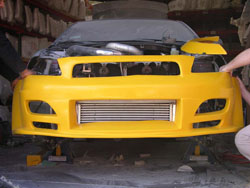
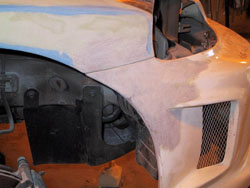
Remove any necessary parts from the vehicle such as factory bumper, bumper crash bar and any support hardware that may be in the way. Bumper shown below did not require bumper support bar to be removed as it was integrated into the design of the new bumper. Please be advised that 3 out of 4 on average front bumper replacements will require you to either remove the 5mph crash bar, modify it for clearance or replace it with a custom fabricated support bar.
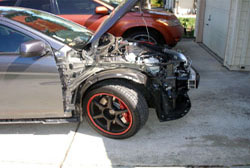
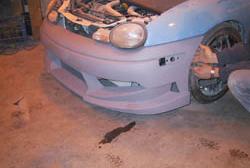
Dry fit the new pieces on the vehicle by holding them up to the mounting points and checking to see how close the products fit. You need to gauge the fitment before proceeding any further as you cannot alter a part that has already been painted. If the part is not lining up on first try please double check that any hardware or removable items are out of the way. If all parts are out of the way on the vehicle side you will need to check where on the part the clearance issue is occurring.
Next you will want to determine if this conflict point is something that can be trimmed back or notched on the part for proper clearance.
If you still have difficulty getting the item to line up please take photos of the problem and open a service claim by following the instruction on our website here .
If the part is aligning properly and looks to be close on fitment it is time to hold the panels up to the vehicle and mark your mounting holes to be drilled in the new body kit.
**Tech tip when working with fiberglass use a smaller drill bit first to drill a pilot hole and then use the proper sized bit drilling in reverse at medium speed to create the perfect hole in fiberglass or composite parts. This will prevent the drill bit from catching on the fiberglass and causing it to splinter or shatter.
You want to achieve a full mounting of any items that are to be painted and installed so that if any fine tuning is needed it can be noted and outlined with a marker. The more time spent on the dry fit and mock up the better the final install will look.
Make note of attention to detail of body lines and seams as they often require attention to achieve a perfect install. You will see an obvious quality difference between a job that has been done properly and a job that had minimal mockup and prep and was just painted. You should never paint the item before it is test fit and confirmed.
Once you have verified that fitment of your parts is on point and there are no gaps or alignment issues it is time to pull the parts off the vehicle and get them ready to paint. Every millimeter of the part will be sanded from grits as course as 100 up to a silky smooth 600 grit finish. This is done using sand paper and spot filler to correct any blemishes in the surface and to level out any high or low spots that will cause your painted reflection to have ripples in it. By going over each part with sand paper and filler the part will be readied for it's primer finish. This primer is allowed to cure and then it is sanded flat until it is 100% perfect and ready for your paint color and clearcoat to be applied.
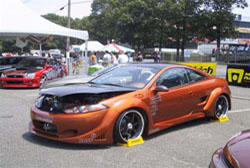
Once your parts are painted and fully cured you can either install them as they are or you can take the finish to a show car level by wetsanding the clear coat and polishing it. This will remove the orange peel like texture that sprayed clearcoat tends to have without additional polishing. By wetsanding the surface you are creating a perfectly flat surface that in turn will reflect light like a mirror. We always recommend going the extra mile as the results are well worth it and if you did not have a passion for your vehicle you probably wouldn't be modifying it in the first place.
Note: We recommend professional installation for all parts. All parts are installed at your own risk. If you notice the part is considerably off, please do not drill or modify in anyway, please take photos and start a customer service claim here. We monitor our customer service claims constantly between the hours of 9AM-5PM PST Monday-Friday.
Before you start, please make sure you have the proper safety equipment to avoid potential harm to you and your vehicle.
Body kit installation can relatively be an easy process; anyone with a little mechanical knowledge should be able to install parts in a few hours. Tools are also very standard, and if you have taken your factory bumper before, replacing it with an aftermarket piece should be no trouble at all.
- Inspect bumper for all bolts, screws and clips holding the bumper to the rest of the vehicle. (Make sure to have the proper tool for disassembly)
- Proceed to remove all fasteners and the actual bumper or bumper cover.
- As you start to test fit the new bumper, please make sure to inspect the section where the part will be place to make sure nothing interferes with the installation (i.e. hanging wires or hoses and splash shields, etc.)
- Carefully proceed to install the new bumper, making sure that there is no interference from other components on the vehicle.
- Some installation will require removal or repositioning of factory components, like impact absorbers, reinforcement bars, horns or fog lights. If any component is interfering with the installation, remove these components and proceed with test fitting the bumper (Make sure to reinstall all vital components back in its place or new location. Some products are meant for show and off-road purposes only. Removal of any factory safety components are at your own risk. )
- Most aftermarket bumpers are mounted the same way as the factory bumpers, so drilling the right hole in the proper location is key to having a good installation.
- With the bumper mocked up in place, make sure it lines up properly with rest of the panels and lights of the vehicle. (Some areas of the bumper are purposely made with extra material to lower the risk of damage during transit. Some bumpers might need to be shaved or filed down in some areas to insure a good fitment.)
- When you are satisfied with the fitment, mark the holes needed for the installation and cut or drill accordingly. (Be very precise in marking holes, as this will determine the accuracy of the fitment to the other panels of the vehicle)
- After holes have been drilled, your part is now ready to be prepped for paint. Because of the characteristics of FRP composites, you would need to block (sand and fill, etc.) the whole bumper to ensure smooth and even application of paint.
- After the paint has dried, you are ready to install the bumper on to the vehicle. After part installation onto vehicle, you may wet sand the clear coat then buff to achieve the shine.
- Check all other components that need to be attached to the new bumper. If other existing factory parts are vital and will not attach to the new bumper, you will have to fabricate brackets or mounts to secure those parts.
- Check if everything is secure and all parts installed. And you are done!
Before you start, please make sure you have the proper safety equipment to avoid potential harm to you and your vehicle.
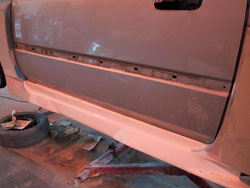
Body kit installation can relatively be an easy process; any one with a little mechanical knowledge should be able to install parts in a few hours. Some side skirt installation might require the wheels off, so be prepared with a lift or jack stands.
Another aspect of installation to point out is the factory rocker panel or rocker moldings. Some installs will require removal or these panels and some will require the panels to be installed. This is very important since some vehicles might not come with these panels and will require it to be purchased from the dealer. So consult with your distributor for the requirements needed for installation.
- Mock up the side skirt to see if it's going to install properly. If the factory rocker panel is interfering with the installation, you are going to have to remove it. If the side skirt looks like a little short at the edges (where it wraps around the wheel well), you might be able to shave a little bit off the corner of the side skirt for a proper fit.
- Install the side skirt using screws on each end right where it wraps around the wheel well. This is the part where you might need to lift the car and take the wheels off.
- There are also a few other places to secure the side skirt, and this will depend on each individual style and application. Some might require screw on the factory rocker panels, the actually door jamb or anywhere else that is not visible when you have the doors closed. Some side skirts will have concave indentations for using rivets and filled over with body filler.
- After completing installation check door clearances to ensure paint will not rub.
Before you start, please make sure you have the proper safety equipment to avoid potential harm to you and your vehicle.
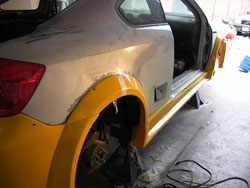
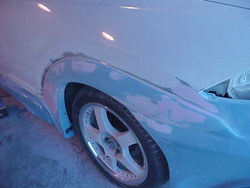
Installing an aftermarket fender is one of the more difficult tasks as far as body kit installation goes. The installer must have knowledge of basic auto body panel alignment and adjustment. If you don't think that you are up for the job, a professional technician might be needed for proper alignment.
- Inspect the factory fender thoroughly. Make sure to check alignment and distance from adjacent panel as you will try to get the aftermarket fender to fit in exactly the same way.
- Remove the factory fender and splash shield. This task might involve removing adjacent panels like front bumper and rocker panels.
- Mock up the aftermarket fender and try to get it aligned as close to the original fender location as possible. Some aftermarket fenders might need shaving and/or bending to get proper fitment. If you are not confident in doing so, this will be a good time to take it to a professional.
- After checking fitment, drill holes to align with all the factory bolts from the original fender. You might also need to attach a few extra screws to get the proper fitment.
- Install aftermarket fender and splash shield, along with the rest of the parts that was uninstalled during the process. In each step. Make sure to double check the fitment, as it may change.
- Check door and hood clearances, and make sure all fasteners are secure. And you are done!
Before you start, please make sure you have the proper safety equipment to avoid potential harm to you and your vehicle.
FRP Composite/Carbon FRP Composite hood installation can relatively be an easy process; anyone with a little mechanical knowledge should be able to install parts in a few hours. Tools are also very standard, and if you have taken your factory parts before, replacing it with an aftermarket piece should be no trouble at all.
- Remove factory hood from the bolts at the end of the hinges. (Do not remove the hinges)
- Install new aftermarket hood by reverse process.
- Tighten bolts to just enough torque to hold the hood in place, but lose enough to be adjusted by a tug.
- Remove hood latch and check alignment.
- If the hood is not aligned properly, adjust accordingly and tighten bolts at the hinges.
- Re-install hood latch and adjust for fitment. (If the hood is latched but not fully close, the latch might need to be adjusted shorter. If the hood does not latch down, the latch might need to be adjusted longer.
- Check for fit and you're done.
Before you start, please make sure you have the proper safety equipment to avoid potential harm to you and your vehicle.
Most aerodynamics are manufactured in fiberglass. Due to the material used in production, body panels, body kits, and aerodynamics will NOT be a direct bolt-on. All aerodynamics will require paint preparation and will NOT be ready to paint out of the box. These products will REQUIRE prepping such as, sanding, shaving, filling gaps, smoothing out gel coat blemishes or other body work. These modifications may include removal or cutting of the OEM bumper reinforcement bars. By complying with our policies, customer understands the procedure and possible difficulty in installing the body kit. We HIGHLY recommend that a professional body shop with fiberglass body kit experience perform the installation. We do NOT recommend customers take their vehicle to a collision repair specialist shop but to source a custom auto shop that is familiar and experienced with vehicle customization, and aftermarket aerodynamics. We are not responsible for payment compensation on a delayed delivery for a scheduled body shop appointment as any order updates given with tracking are for estimated time of arrival and not a guaranteed arrival date.
All aerodynamics sold by Driven By Style LLC are aftermarket products and are intended for off-road or show use only. Driven By Style LLC is not liable for any damages or injury as a result of these products. Due to strict regulations by the Department of Transportation, some of these products are not approved for street/highway use. Removal of reinforcements, bumpers, turn signals, and other safety equipment on the vehicle is the responsibility of the buyer. Driven By Style LLC will not be responsible for your own actions.
Do you guarantee fitment?
Our customer guarantee is that you can return your item within 30 days of receipt for any reason as long as it is returned in the original packaging and you pay for all shipping charges; original shipping fees are non-refundable. Products are non-refundable if altered in any way. It is recommended that the part be installed by a professional body shop that has experience working with aftermarket fiberglass and urethane body kits. Paint and installation process will include but are not limited to sanding, shaving, cutting and filling. Extra fees may be incurred for proper fitment. Refunds will not be issued due to minor fitment issues. All parts are for off-road and show use only.
Do I need to remove the bumper reinforcement bar?
The removal of the reinforcement bar may be necessary for the fitment of our aftermarket products. In some instances the reinforcement bar may only need to be trimmed down for fitment of our products. The reinforcement bar and mounting hardware on your vehicle are designed for the OEM equipped bumpers and may require modification or removal to allow an aftermarket non OEM bumper to be installed.
Is it hard to install these products?
For an experienced autobody man, it is very simple to install our products. This is not always the case for body shops that have no experience in installing aftermarket body kits. Even though you might feel you have the experience and knowledge to install it yourself, we do not recommend for any of our customers to install the products themselves. Please be advised that our recommendation is to take it to a professional familiar with custom auto body and body kits.
What kind of body shop should I have this kit installed by?
When looking for a body shop to install your kit, look for one with experience in doing such installations. A body shop with 30 years experience in doing collision work but no experience in aftermarket body kits is not recommended. It would be better to take the kit to a body shop with just 2 years in business but specialize in installing aftermarket body kits. Ask to see examples of other finished vehicles to ensure that they really do have the experience they claim.
Installation Notes:
Nearly all body kits will require some amount of skill to install. We recommend body shops with custom car experience and that work with body kits, fiberglass and composites on a regular daily basis. We do not advise our customers to seek installation services at collision repair shops with little experience in working with body kits. They often will not have the necessary experience to properly quote a job and as soon as they run into any type of difficulty they contact their customer back with an outrageous price. A custom car shop will be able to look at your parts and give you a pretty solid estimate of what the job will cost. They will know how to solve issues on the fly that other shops will nickel and dime you on and drive your bill cost up. Always keep in mind that when modifying your vehicle or building a vehicle to compete in car shows that the process will require lots of labor and attention to detail. Make sure to choose your install shop wisely.
Are fiberglass body kits repairable if I damage it while driving?
Yes they are repairable and quite easily too. Fiberglass body kits also known as FRP are easy to repair as long as you have the damaged pieces. If it is a crack it can be repaired in minimal time but if the parts is broken into several pieces it will take more time to do so.
What materials and tools are needed for fiberglass aerodynamics repair?
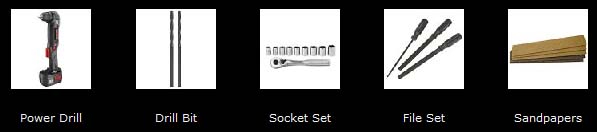
You will need some basic materials that you can source from a local hardware store such as latex gloves, mixing containers, throw away paint brushes, lacquer thinner, rags and masking tape. Some auto parts stores will carry the fiberglass resin and fiberglass mat but if you need it can be sourced online from www.fiberglast.com and www.uscomposites.com. You will also need sand paper 40 grit, 80 grit, 120 grit, 180 grit as well as light weight body filler. We prefer Evercoat body fillers such as Chrome A Lite as they are easy to use and easy to sand. Tools of the trade include DA Sander and an Angle Grinder with 3M Brand 2" Roloc course sanding discs.
What steps do I take to fix a damaged fiberglass aerodynamic part?
You will want to start the repair from the back side of the part. This would apply to bumpers, fenders etc. First you will need to clean the part with soapy water and rinse clean. Allow the part to dry totally before proceeding. You will take the angle grinder and start to rough up the surface on the back of the crack extending about 6" in each direction. Once this is done use a blower tip on your air line from the compressor to blast all the dust and loose debris away and off the part. You will then use a clean rag and lacquer thinner to clean the part in preparation for fiberglass. If the crack is wide and you can see through to the other side you can apply masking tape over the crack from the front to seal it off. It is time to fiberglass the part back together. You will start by pouring a small amount of fiberglass resin into a mixing cup and then adding the liquid hardener before stirring to mix and activate the chemicals. Once the resin has been catalyzed it is time to start dabbing the resin onto the back of the part with the paint brush. We buy 2" throw away brushes online from amazon.com for about $.50 each in bulk. Once the resin is applied to the back of the repair its time to start adding the fiberglass mat and reinforce the structural integrity of the part. I like to take my fiberglass mat and rip it into small 4" square pieces. You will find that if you ball the pieces up in your hand they will become more flexible and easy to work with as you start to add them to the resined area. As you get the fiberglass mat applied you will need to dab with your brush with more resin and you will see the white fiberglass mat disappear as it absorbs the resin. You will want to add 2-4 layers of resin and mat to complete the repair. Allow the fiberglass to cure fully before you proceed to flip the part over and work from the front. You will repeat the same process on the front by roughing up the surface and widening out the crack if it was just a split and if it was a big hole you will want to bevel the edges into the newly repaired back area. It is a good idea to add 1-2 layers of fiberglass to the front and then sand it flat with a DA sander. Once that is done you have a strong fiberglass repair ready for finish work with a minimal amount of body filler needed.